
Post Menu and Details.
- How to clean Razer Keyboard?
- Step 1: Get the keyboard ready for cleaning.
- Step 2: Start cleaning the keycaps.
- Step 3: Clean the keyboard now
- Step 4: Put the keycaps back in their original positions.
- Conclusion:
Words: 924
Reading time: ~4 minutes
Razer keyboards are pretty popular in the gaming world. However, due to the led lights, the dirt, dust, and gunk appear visibly on these keyboards. That’s why they need proper cleaning and maintenance.
This guide will discuss how to clean the Razer keyboard thoroughly, helping you maintain your keyboard. Alternatively, it is always wise to choose a professional computer repair service to do these tasks.
How to clean Razer Keyboard?
Before cleaning your keyboard, make sure that you wash your hands. The keyboard is known to harbor bacteria and germs, and it is no different. Before cleaning your keyboard, you should always wash your hands and the keys. You can disinfect your keyboard with rubbing alcohol if you don’t want to take the time to wash your hands. If you’re worried that you’ve missed anything, you can always gently turn the keyboard over afterward to ensure that all keys are clean.
If you’re using a keyboard with pass-through ports, it’s important to turn the device off and wipe it clean. Never submerge it in water or allow it to soak into the keys, as this will void the warranty. To do this, make sure to unplug it from your computer. Disconnect any external devices connected to the keyboard. After rinsing the keyboard, make sure that there’s no visible debris on the surface. Never wipe dirt or debris into the Blade, as it may cause minor scratches. Always wipe off excess alcohol before wiping the keys.
You need to follow some steps to clean your keyboard correctly. So, let’s move on to the appropriate methods. But first, you will need some materials to get started.
Materials:
- A plastic bowl
- Isopropyl alcohol (concentrated at about 70%)
- Microfiber cloth
- Cotton swabs/Cotton balls
- Compressed air can/Laptop cleaning spray
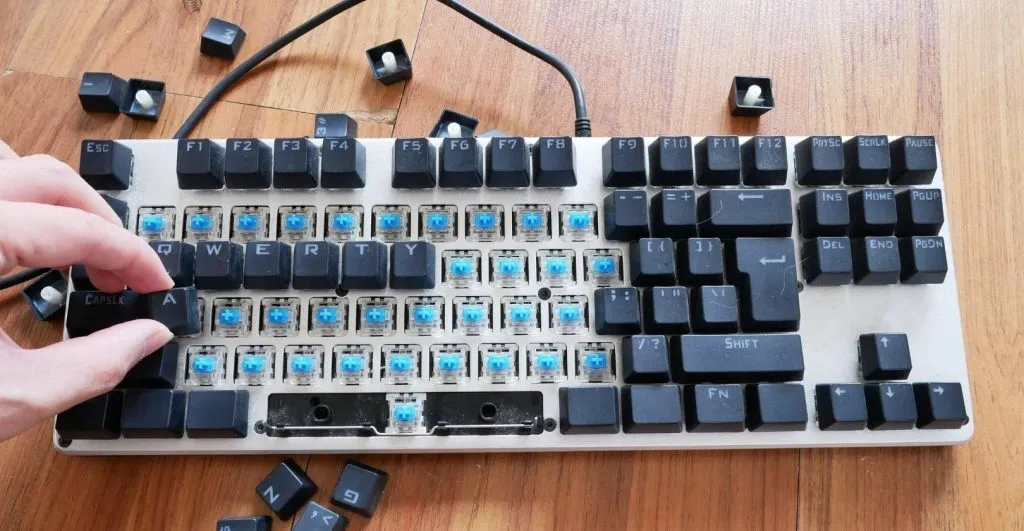
Step 1: Get the keyboard ready for cleaning.
- Unplug the keyboard from the computer and turn off the LED lights.
- Take a photograph of the keyboard on your cell phone. That way, when you remove the keycaps, you’ll be able to place them back perfectly.
- Now, remove the keycaps one by one. You must gently apply the force to prevent the keycaps from getting damaged.
- Keys like backspace, shift, tab, capslock, enter, spacebar, etc., are connected by white clips. You must lift those clips with great care and remove the keycaps.
Note: Some models of Razer keyboards like Chroma require a flathead screwdriver for removing the keycaps.
Step 2: Start cleaning the keycaps.
Collect the keycaps in the plastic bowl. Proceed to use any of the two methods mentioned below to clean them.
- Take isopropyl alcohol and a microfiber cloth. Put the alcohol on the cloth and clean one keycap at a time. You can also use cotton swabs or cotton balls by dipping them in the alcohol. Keep cleaning until there are no dirt or gunk remains.
- If you cannot spare the time to clean the keycaps one by one, keeping the keycaps in lukewarm water for at least 30 minutes would do the job. It’ll allow all the gunk and slime to wear off. So, you won’t have to put much effort into scrubbing them, simply wiping the keycaps dry.
Step 3: Clean the keyboard now
You can use any of the two methods mentioned below to clean the keyboard.
- Take the compressed air can or the laptop cleaning spray. Slowly go through all the keyboard rows spraying the compressed air, removing all the muck. If some of the dirt remains, you can use the alcohol to wipe it clean.
- You can use the cotton swabs dipped in alcohol to clean the grooves while using the cotton balls to scrub the outer portion of the keyboard. However, it would help to squeeze them properly not to damage the led lights. Also, keep the keyboard away from water.
- For stubborn stains and dust, you can use an alcohol-cotton swab to remove them. Alcohol also removes fingerprints. You can also use a cotton swab dipped in isopropyl alcohol to clean the grooves of the keyboard. If this method doesn’t work, you can also chip away the gunk with a pocket knife. However, it would be best to be careful not to damage the LED light.
Step 4: Put the keycaps back in their original positions.
- Ensure that the keycaps and the keyboard are fully dry.
- Use the picture you took before to not make any mistakes with the arrangement.
- Now, start putting the keycaps back.
- You will hear a clicking sound that’ll ensure that the keycap is perfectly fixed in its place.
- After putting the keycaps back, make sure there aren’t any missing spots left.
- Recheck the placement of the keycaps with the picture and plug it in.
- Now, turn on the led lights and make sure everything’s cleaned.
The Razer community is available to answer any questions you might have about the keyboard. It’s always good to check online reviews for Razer products before you purchase one. Razer keyboards are known to be extremely durable, but dirt can still accumulate and hinder their performance. So, it’s crucial to clean your keyboard regularly to prevent this from happening. And if you’re not sure how to clean the razor blade keyboard, don’t hesitate to contact their customer support team.
Conclusion:
The methods mentioned in this article will help you clean the Razer keyboard thoroughly. However, if it isn’t too dirty or has gunk attached, cleaning it with alcohol and cotton balls or cloth without taking off the keycaps would be fine. Also,
if you aren’t good with technical stuff, removing the keycaps would be a risk. It is suggested that you clean the keyboard without removing the keycaps.
Thank you for reading!